• Skip to primary navigation
  • Skip to main content
  • Skip to primary sidebar

Loving It Vegan

  • Home
  • About Me
  • Recipes
  • Free Ebook
menu icon
go to homepage
  • Home
  • About Me
  • Recipes
  • Free Ebook
    • Facebook
    • Instagram
    • Pinterest
    • Twitter
    • YouTube
  • search icon
    Homepage link
    • Home
    • About Me
    • Recipes
    • Free Ebook
    • Facebook
    • Instagram
    • Pinterest
    • Twitter
    • YouTube
  • ×

    Home » Appetizers

    Roasted Garlic Hummus

    Published: Aug 14, 2020 Updated: Apr 26, 2022 by Alison Andrews This post may contain affiliate links

    Jump to Recipe Print Recipe
    Roasted Garlic Hummus

    Seriously the BEST roasted garlic hummus. Packed with flavor from two whole heads of roasted garlic, it’s insanely delicious and the perfect dip.

    Roasted garlic hummus topped with fresh parsley, olive oil and sesame seeds in a ceramic bowl.

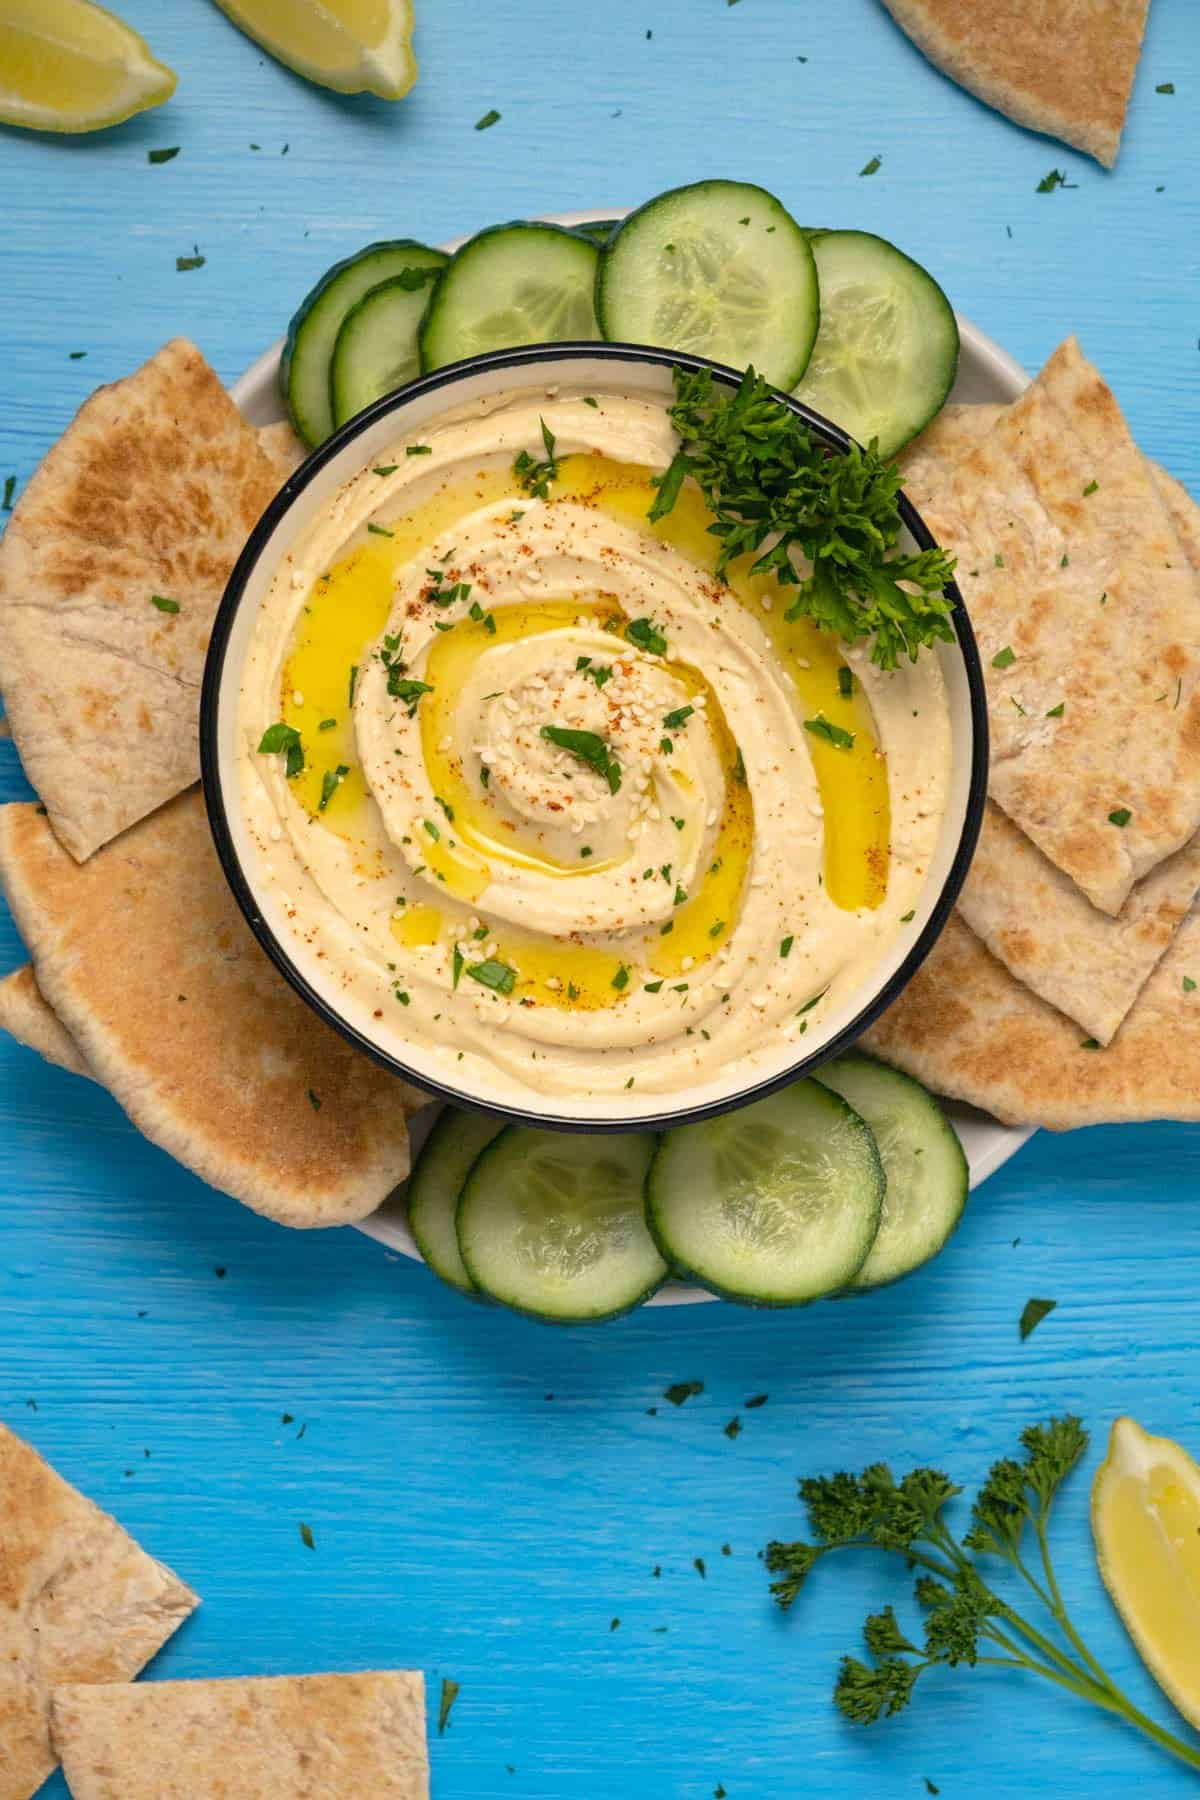
    This roasted garlic hummus is so easy and delicious.

    It’s made with two heads of roasted garlic for the most delicious flavor.

    Roasted garlic in itself is a dreamy thing. Roasting garlic takes all the bite out of garlic, leaving behind only the pure deliciousness of the garlic flavor.

    Blended into hummus, roasted garlic takes regular hummus and catapults it up several notches on the yum scale!

    We’re big fans of hummus, which is why we’ve already made a classic hummus recipe, a roasted red pepper hummus and a roasted butternut hummus. Oh yeah!

    You might think that using two whole heads of roasted garlic equals an overpowering garlic flavor but that isn’t the case at all.

    The flavor is still subtle. It’s rich and delicious but it’s not at all overpowering.

    Roasting the garlic takes the bulk of time in this recipe, once the garlic is roasted, then it’s just a case of throwing everything into the food processor and a couple of minutes later you have hummus!

    Hummus topped with sesame seeds, chopped parsley and olive oil in a ceramic bowl.

    How To Make Roasted Garlic Hummus

    You will find full instructions and measurements in the recipe card at the bottom of the post. This is a summary of the process to go along with the process photos.

    Roast The Garlic:

    • Remove the outer flaky layers of two heads of garlic, leaving the inner skins intact.
    • Use a sharp knife to cut off just the tips of each clove of garlic on both heads.
    • Place the garlic in tinfoil, pour over a little olive oil and rub it around the sides so that the garlic is covered with the oil.
    Whole heads of garlic with olive oil, in foil.
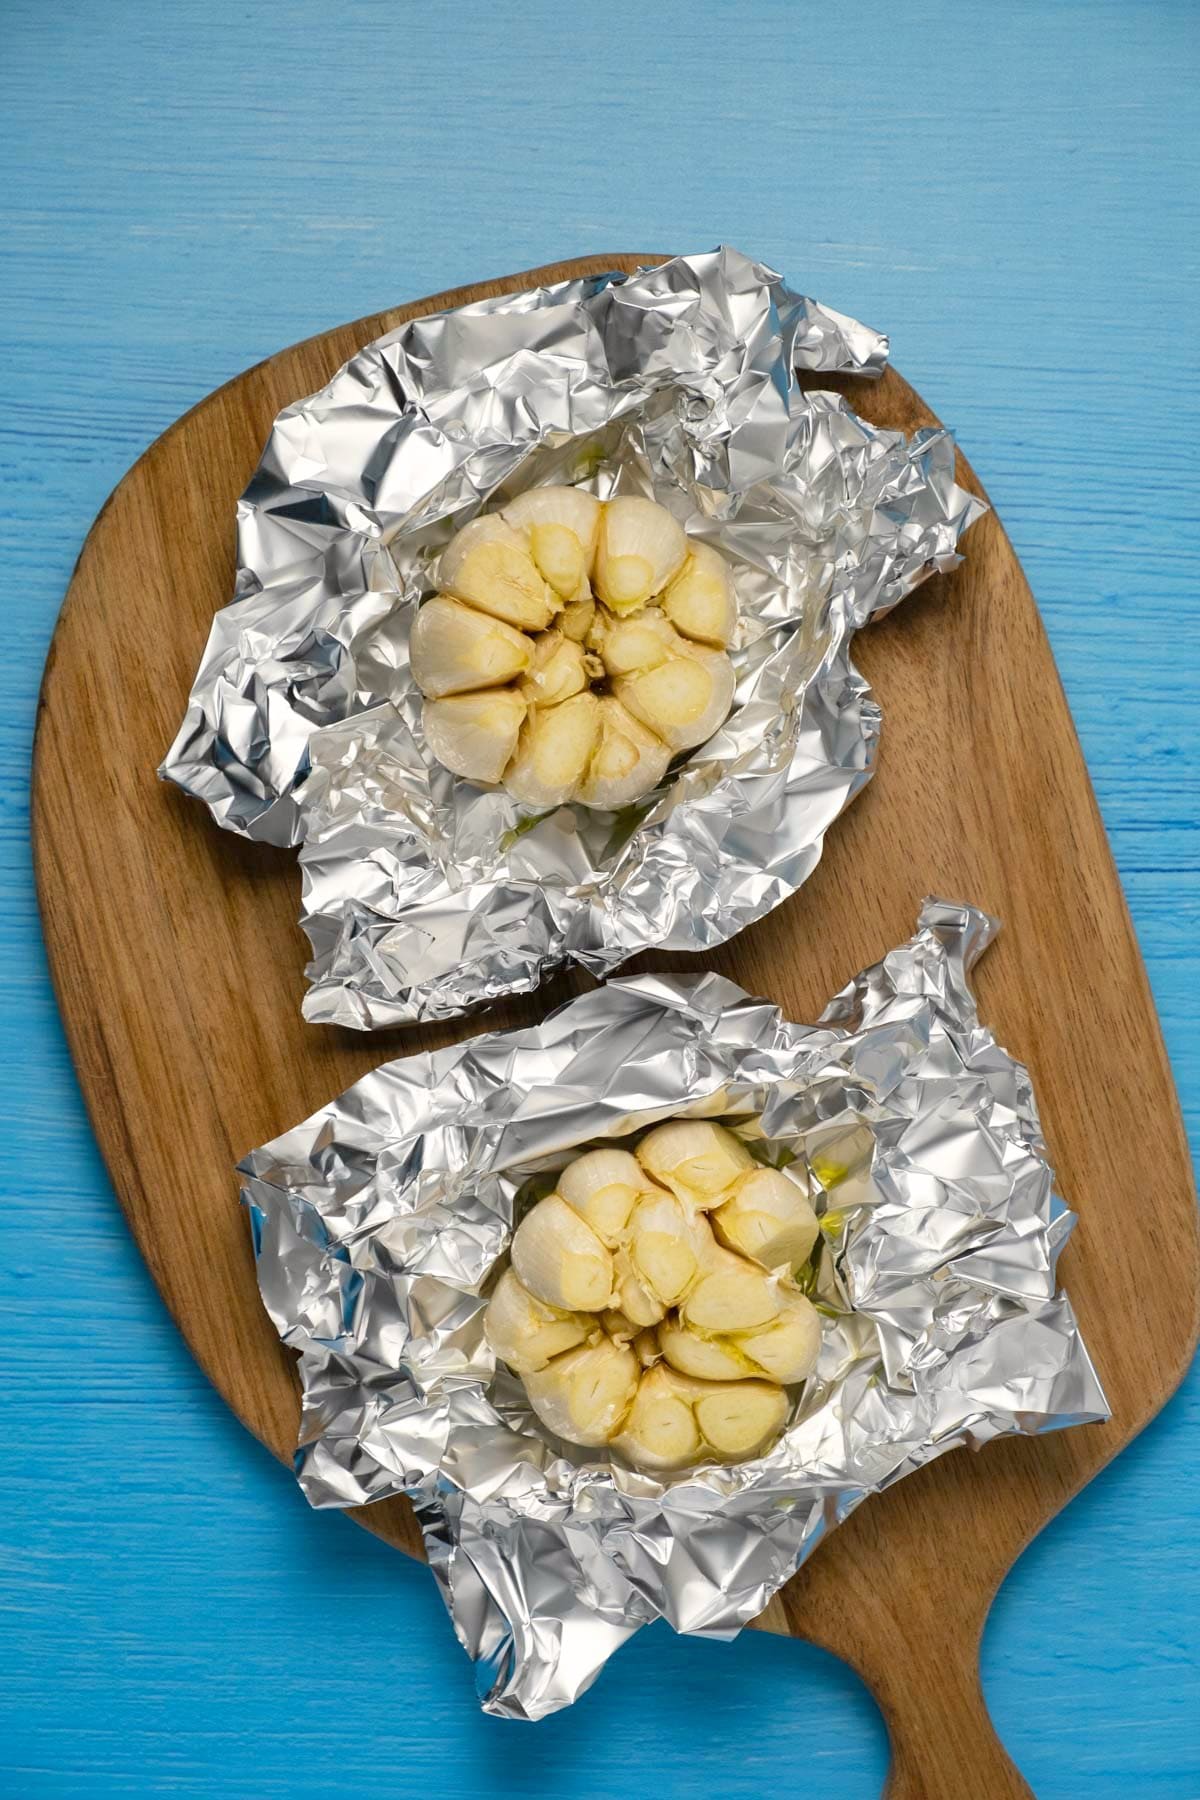
    • Wrap it up in the tinfoil and bake in the oven at 430°F for 35 minutes.
    Whole heads of garlic wrapped in foil after baking.
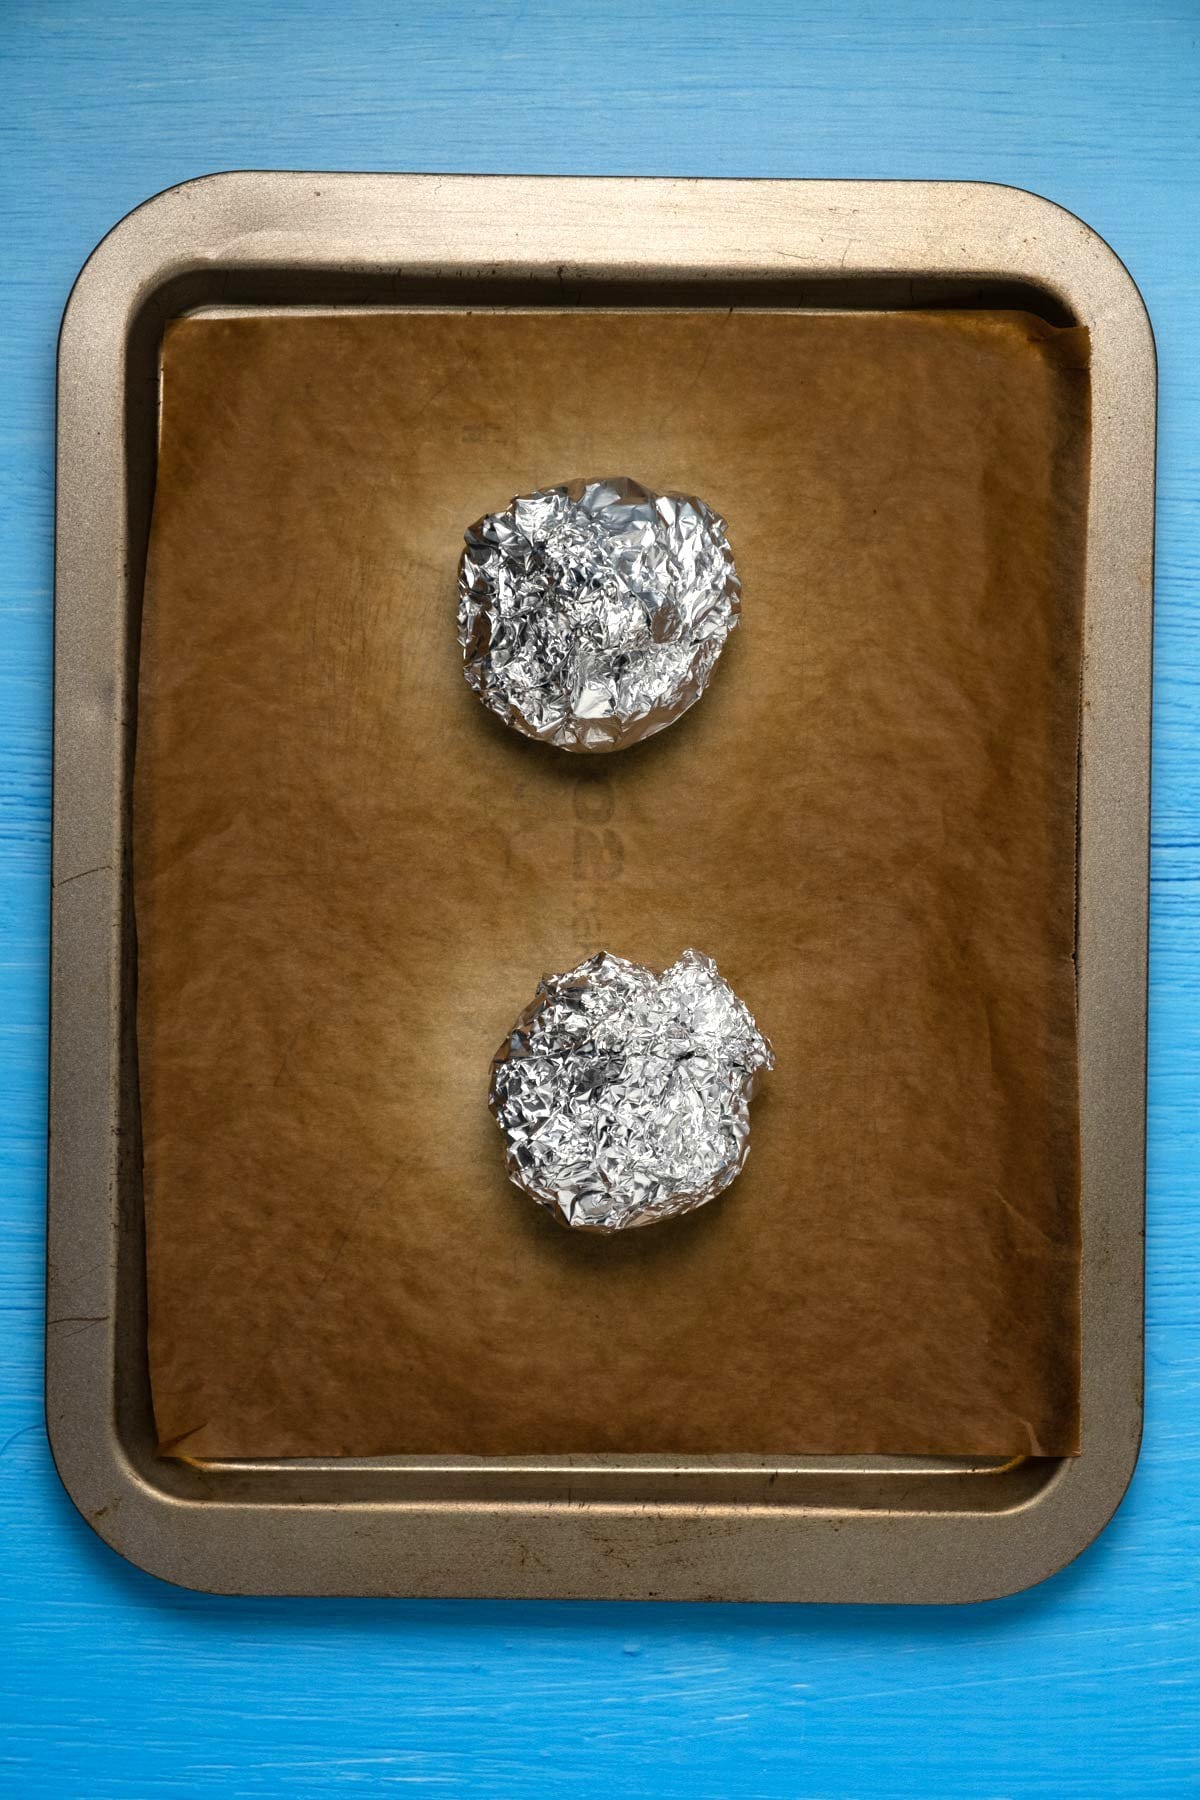
    • When it’s roasted, let it cool for a few minutes.
    Whole heads of garlic after roasting.
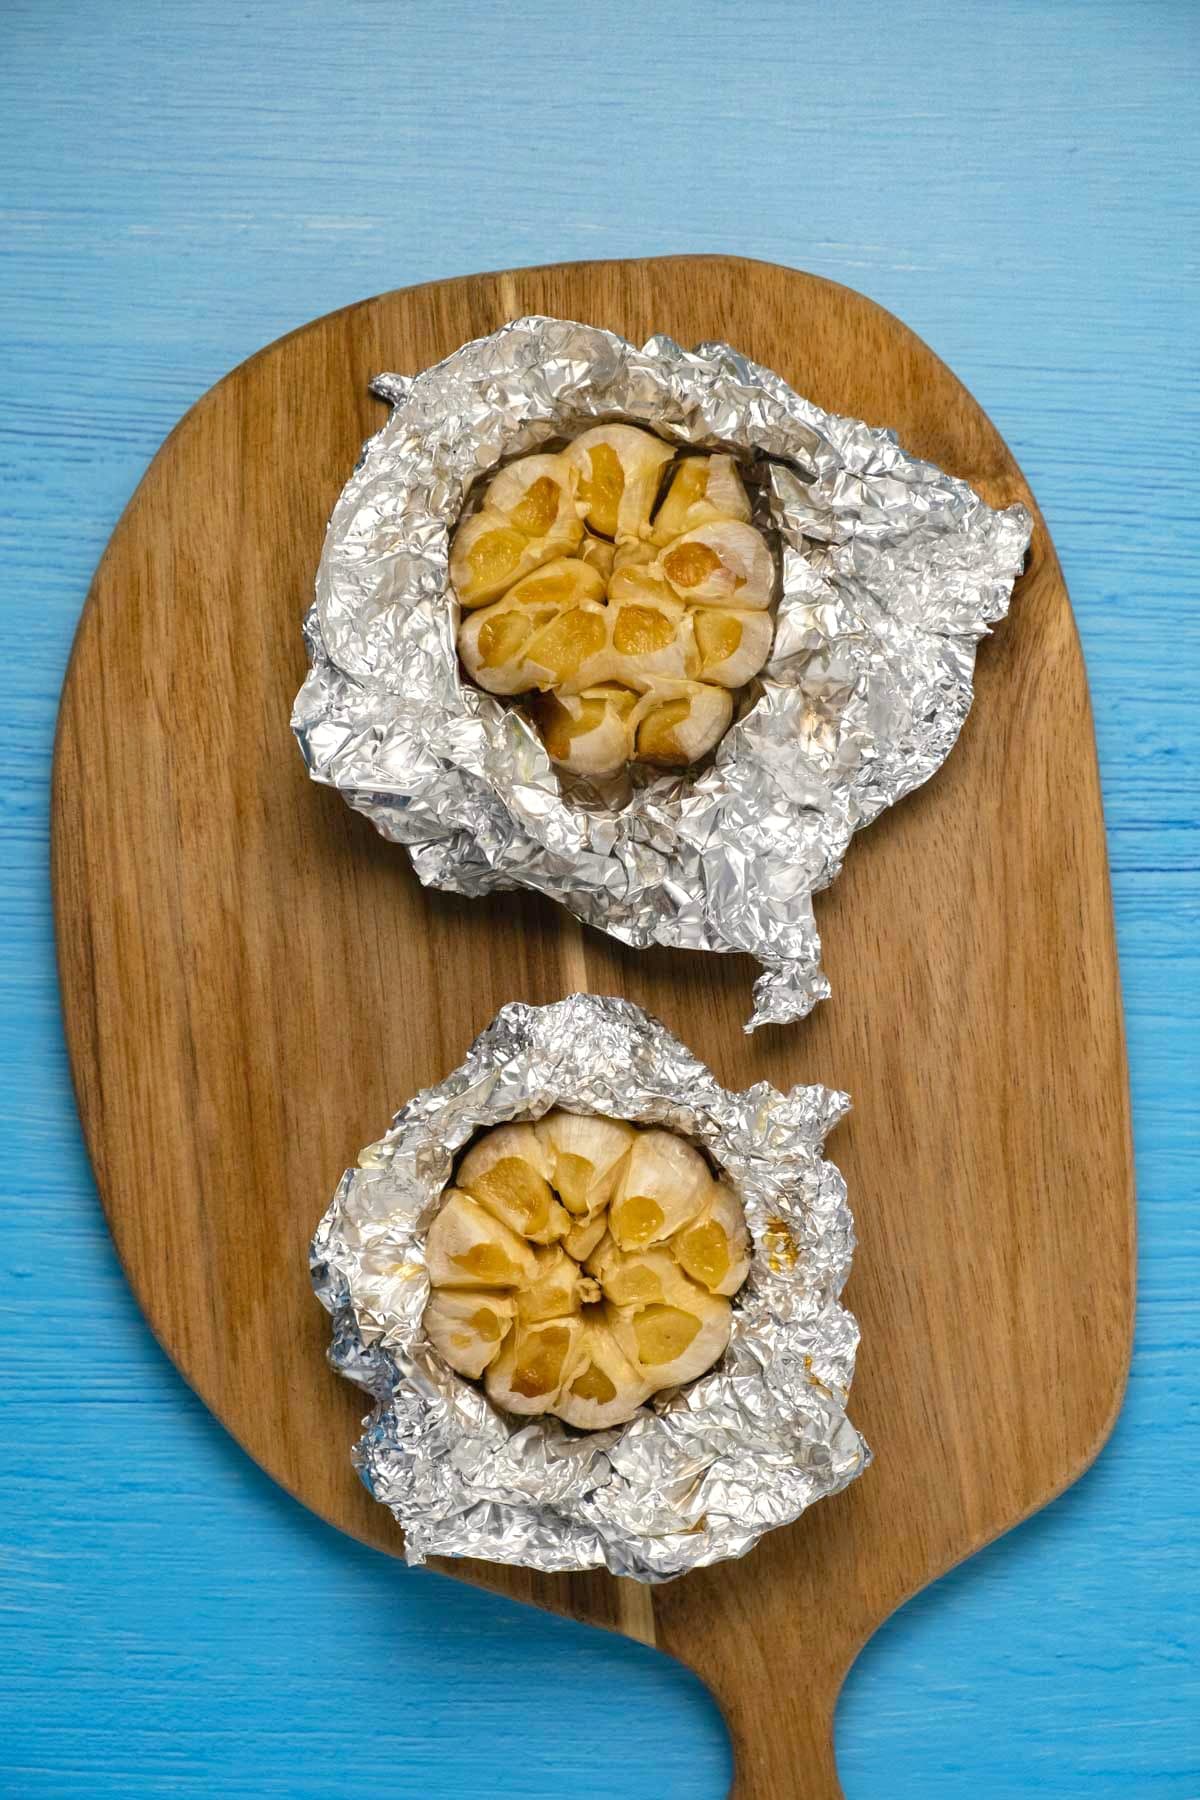
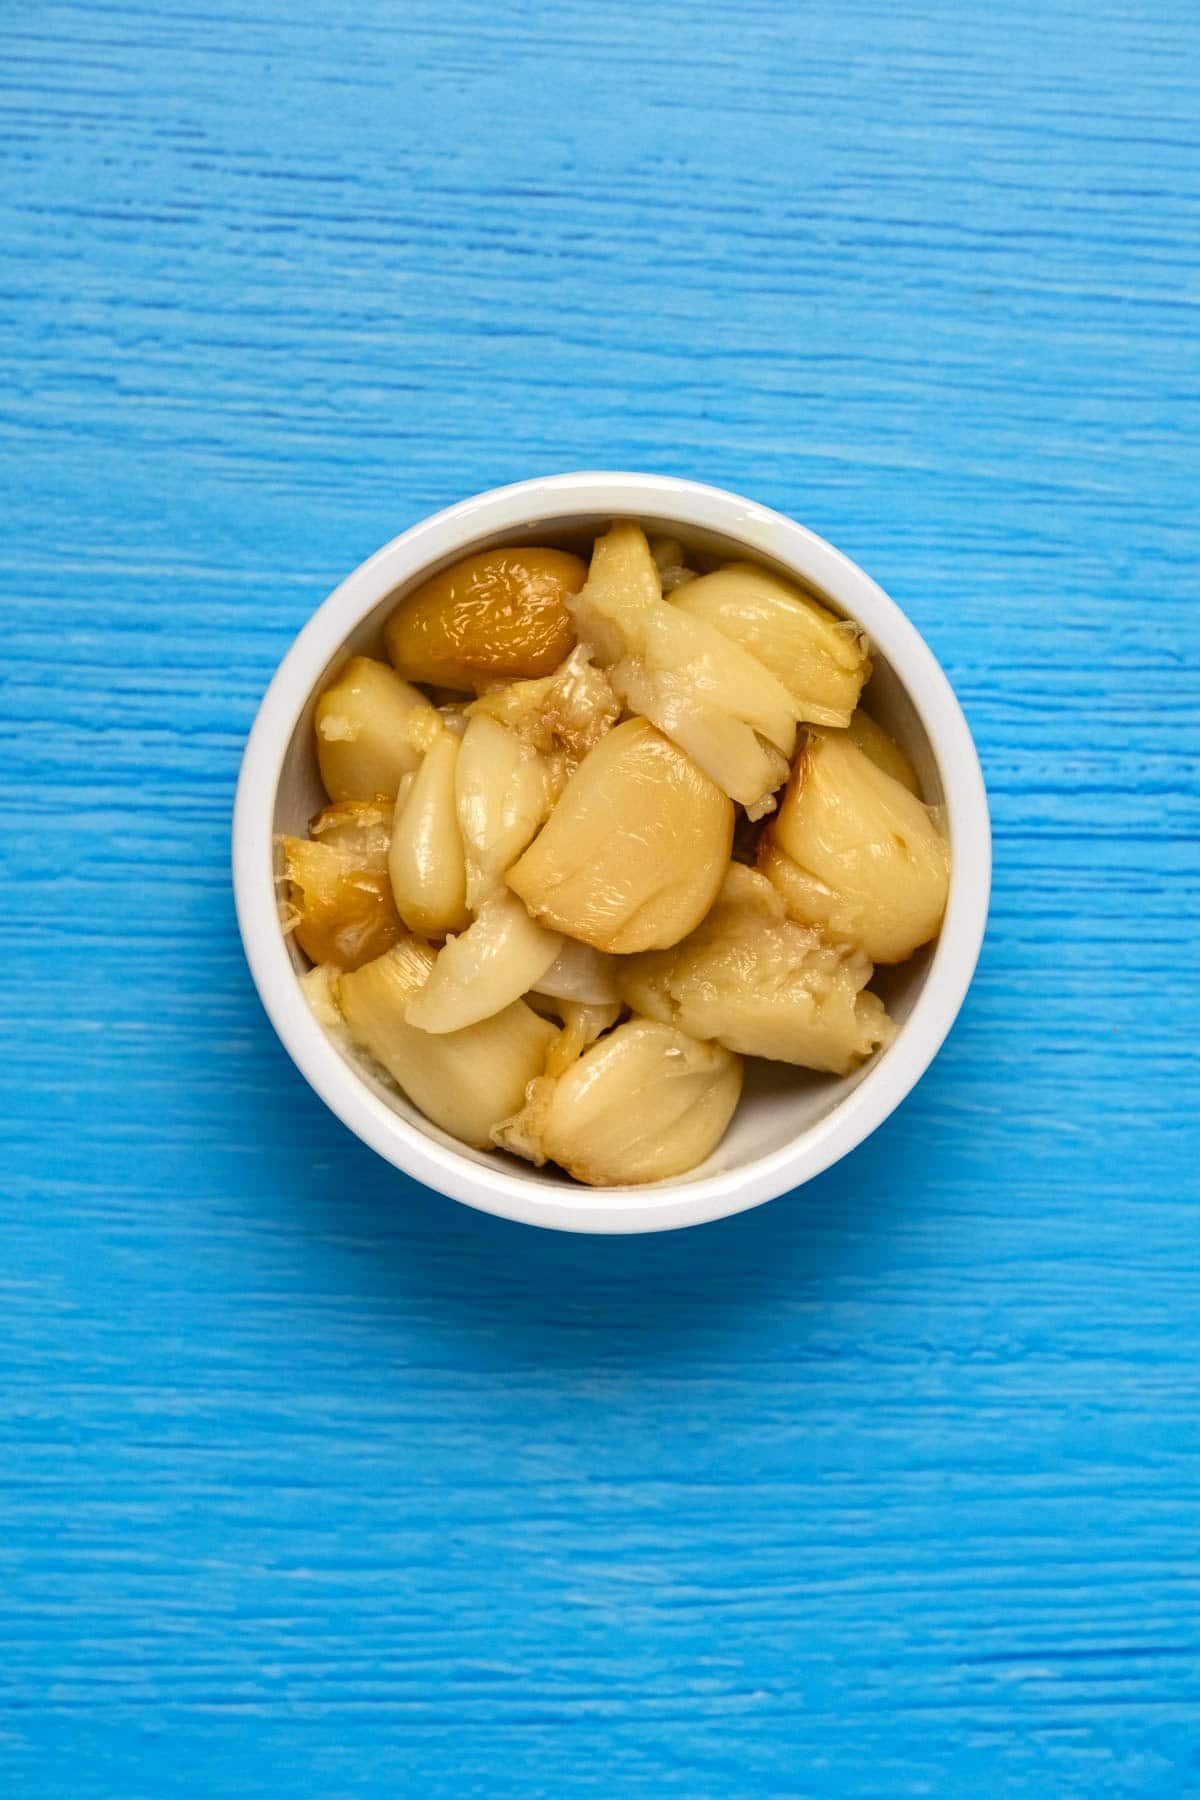
    • When it’s cool enough to handle, use your fingers to pop the cloves of garlic out into a bowl.
    Roasted garlic cloves in a white bowl.

    Make The Hummus:

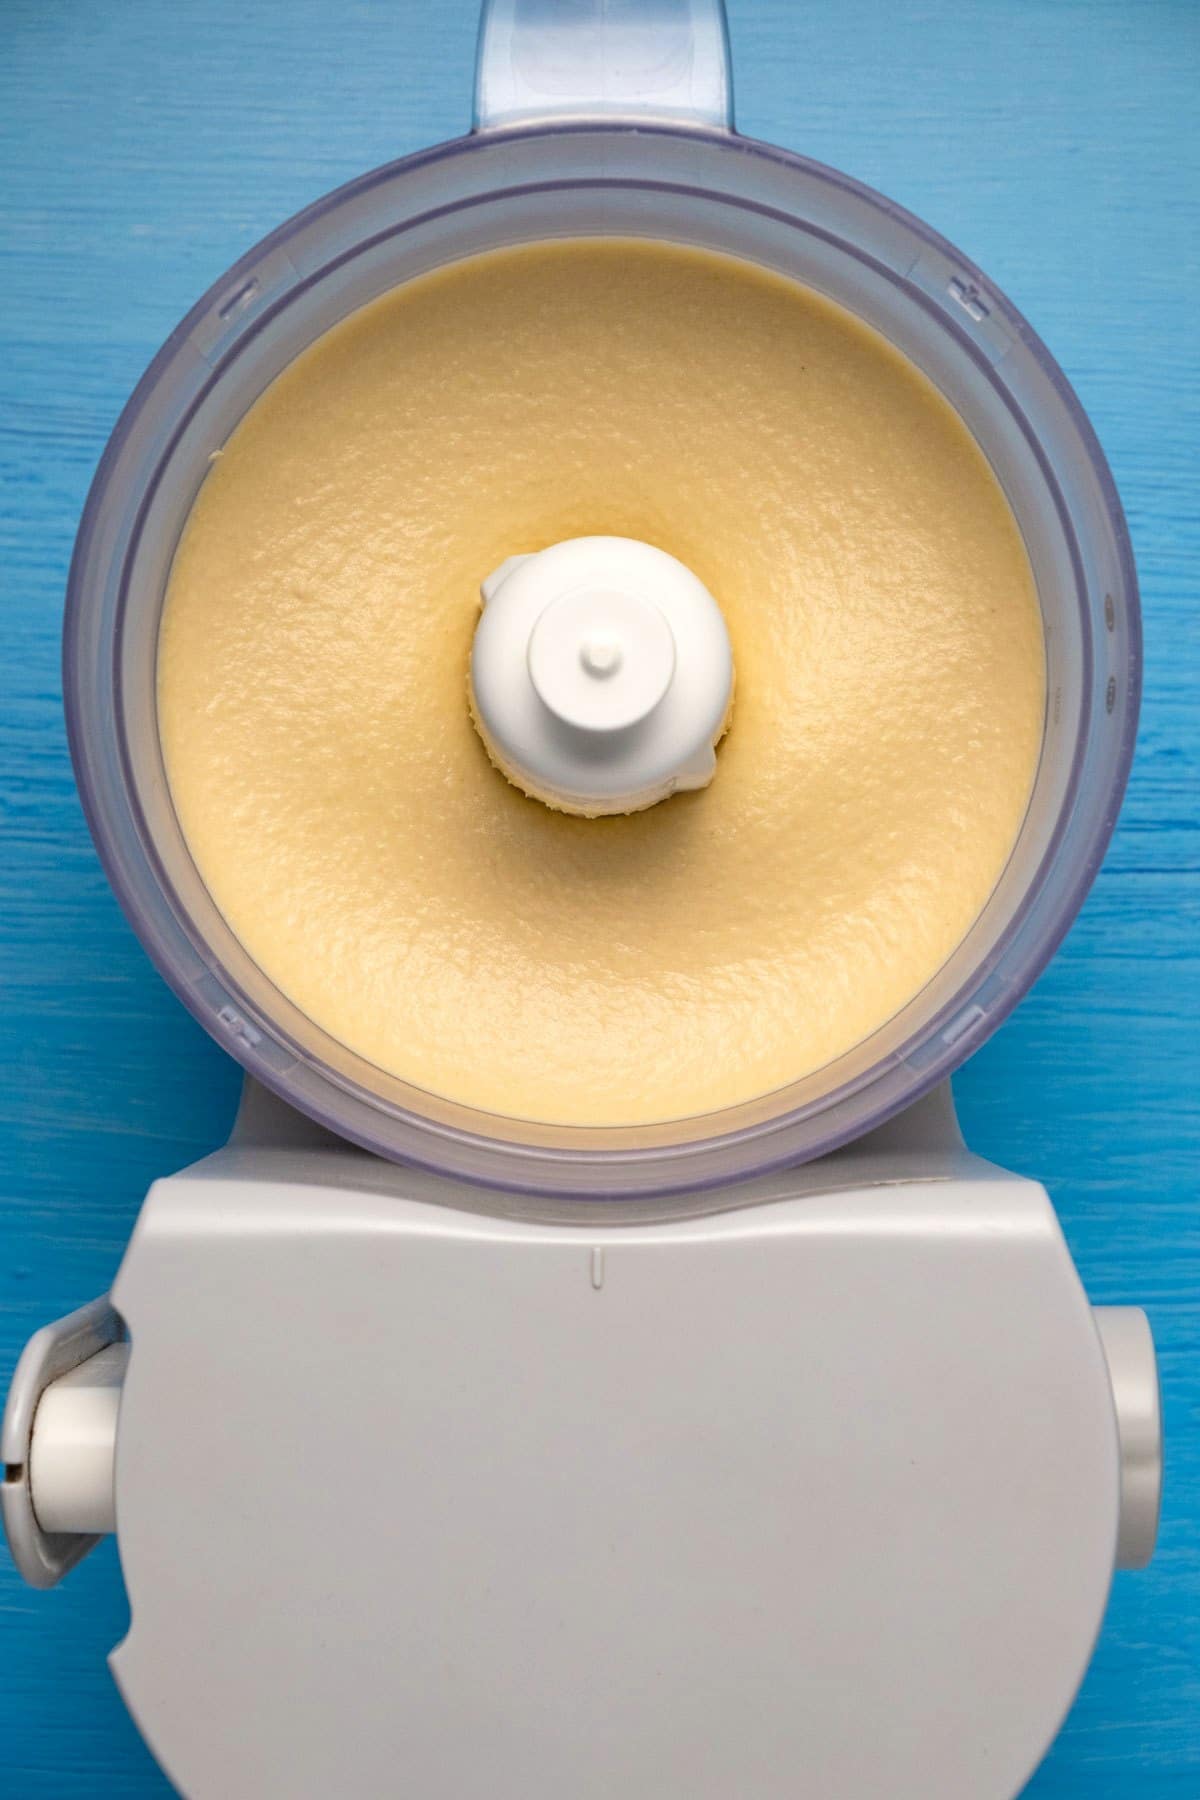
    • Add chickpeas, roasted garlic, lemon juice, tahini and a little cold water to the food processor.
    Ingredients for roasted garlic hummus added to food processor.
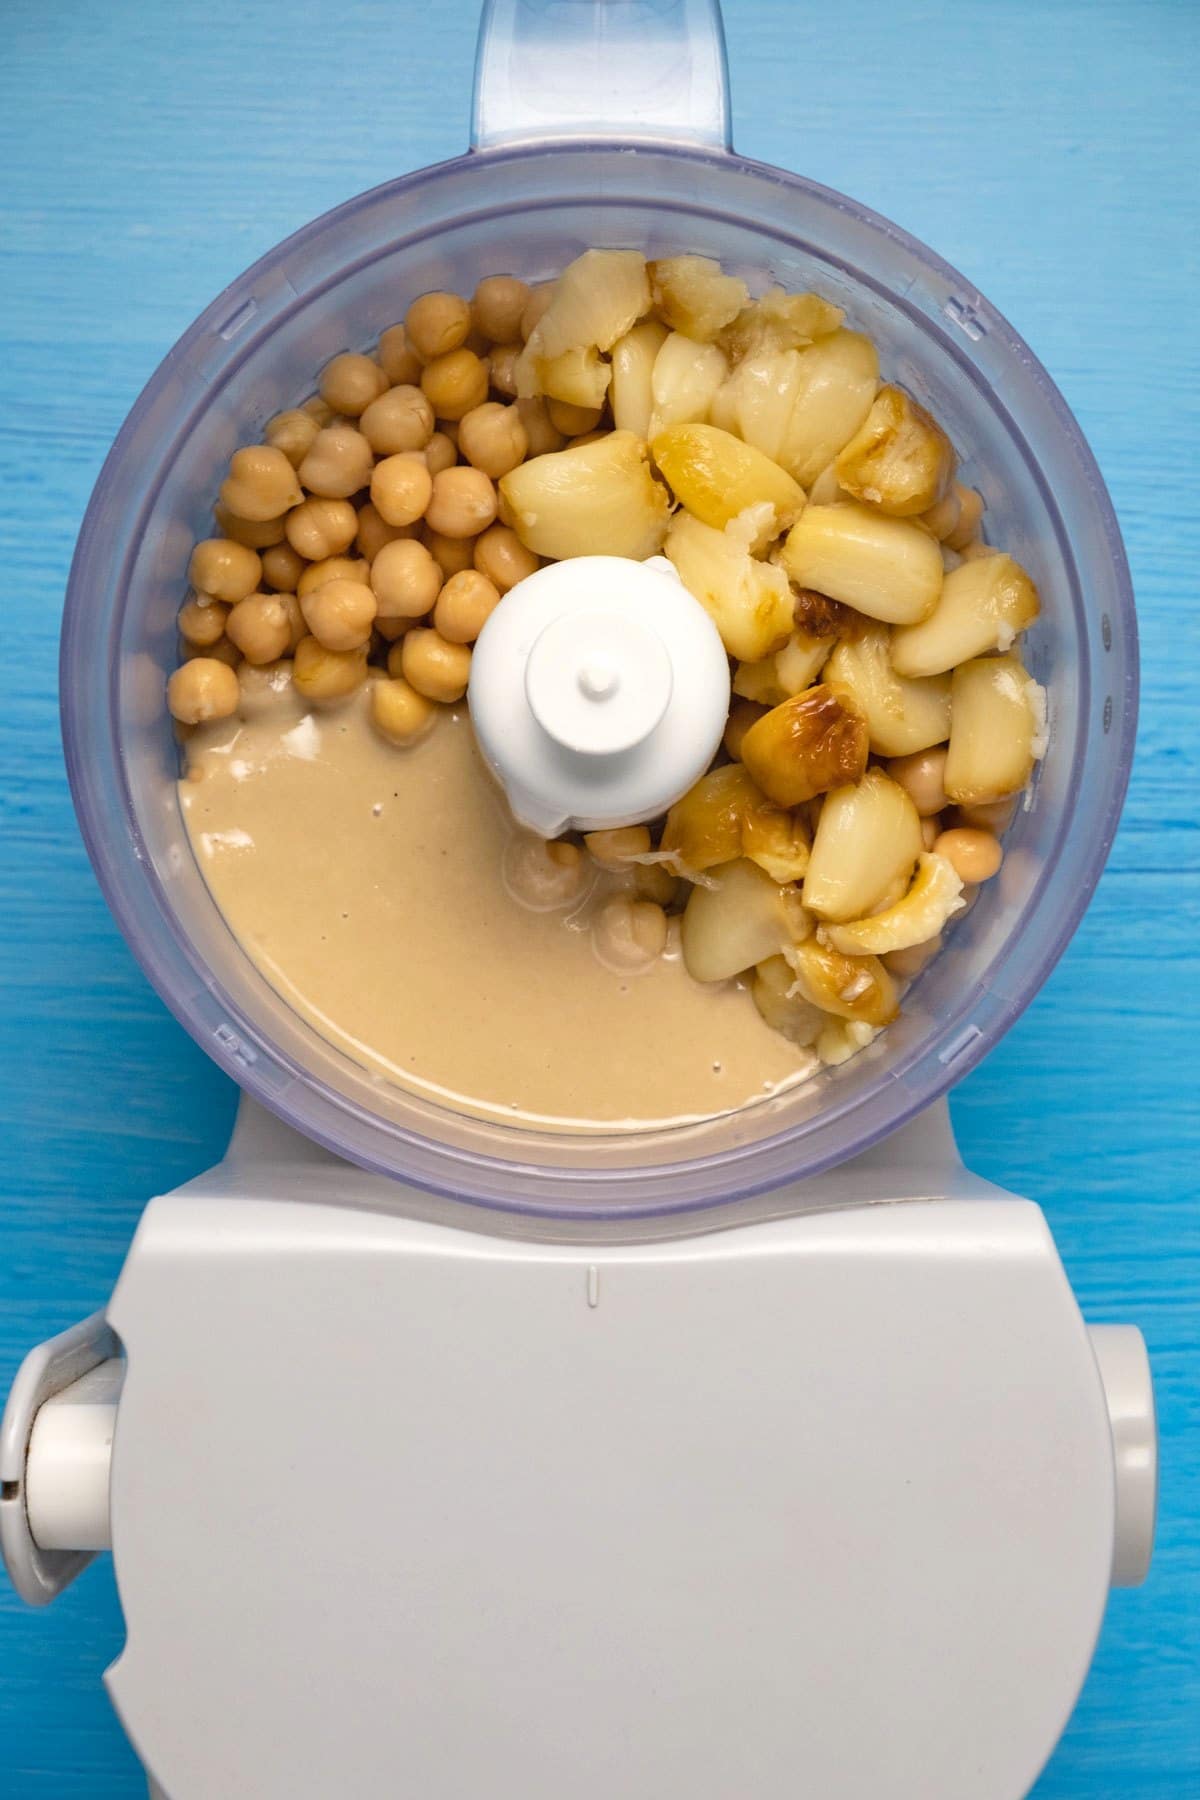
    • Process until chunky. Then add in salt, cumin, olive oil and a little more cold water.
    Chunky roasted garlic hummus in food processor, with olive oil, salt, cumin added.
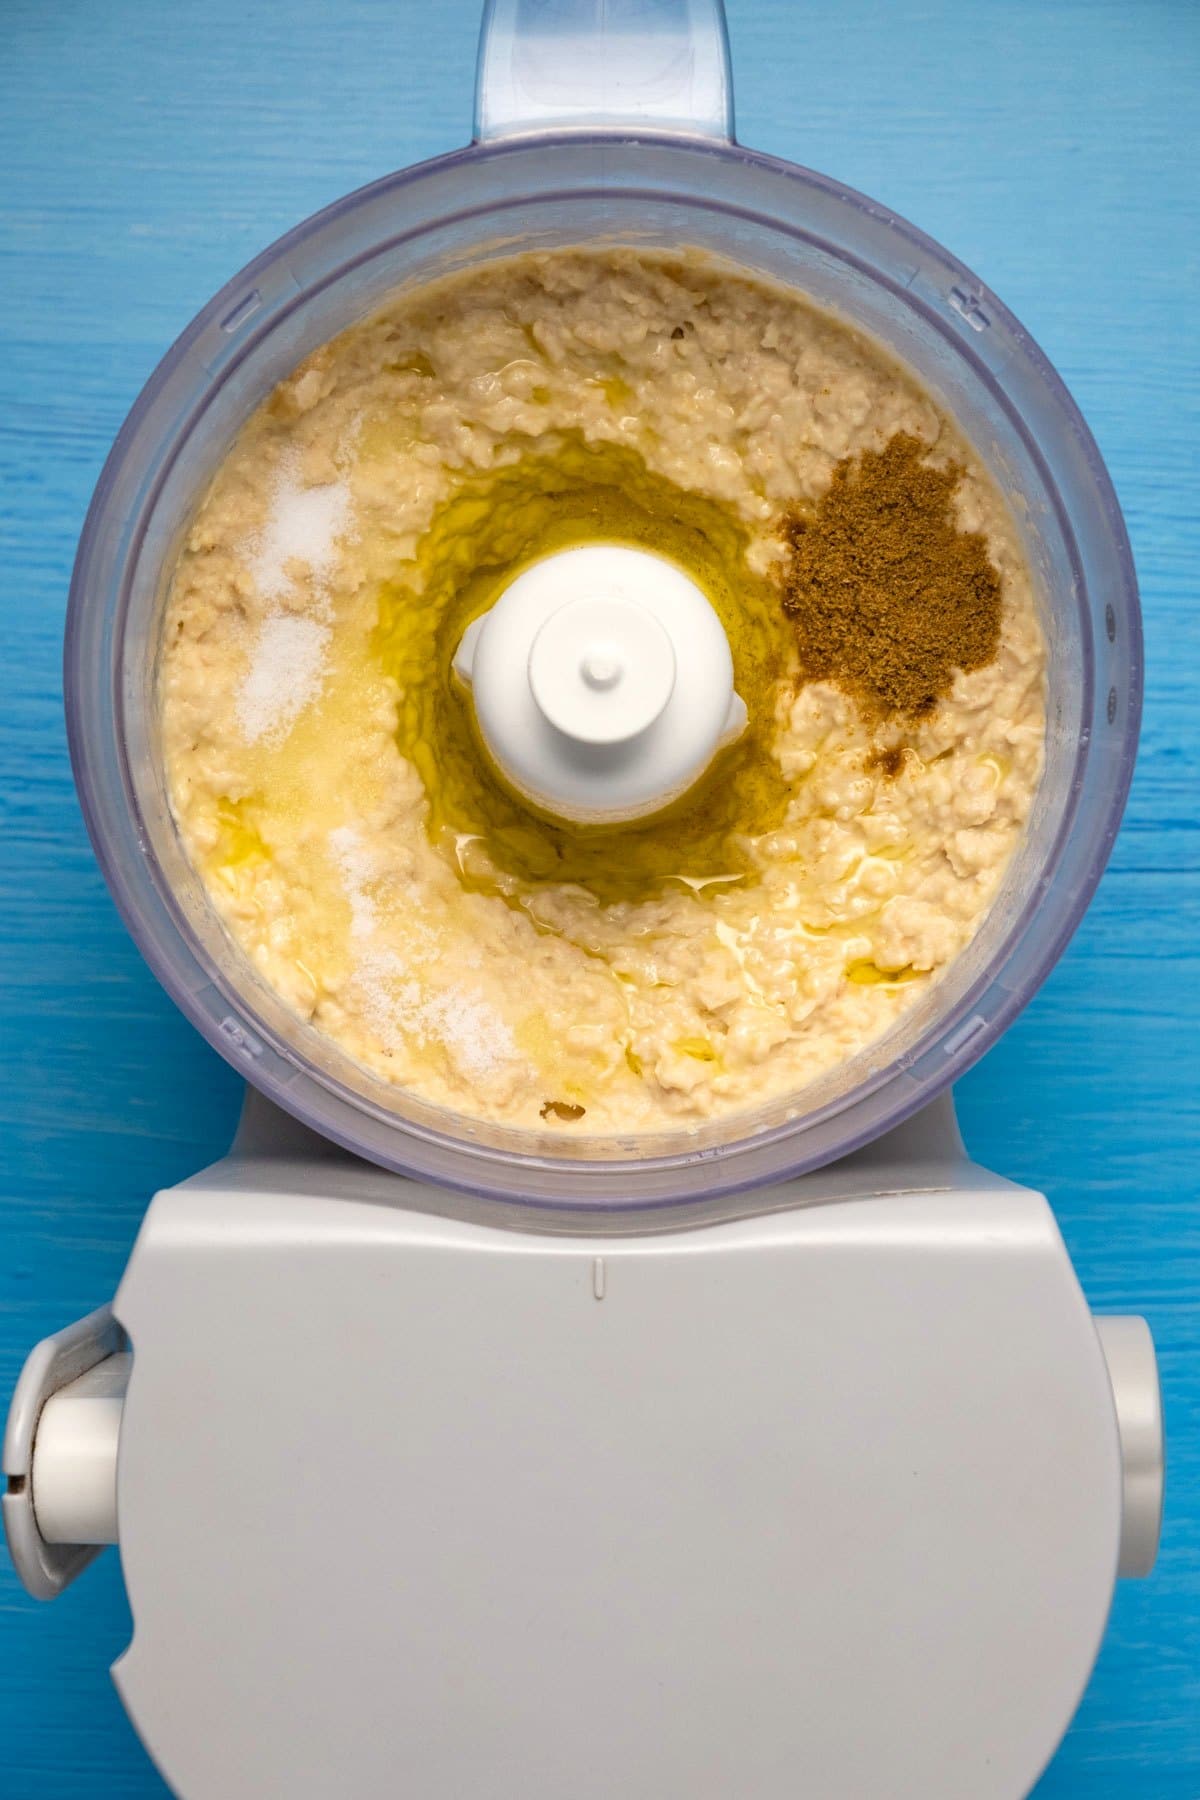
    • Process until smooth and creamy.

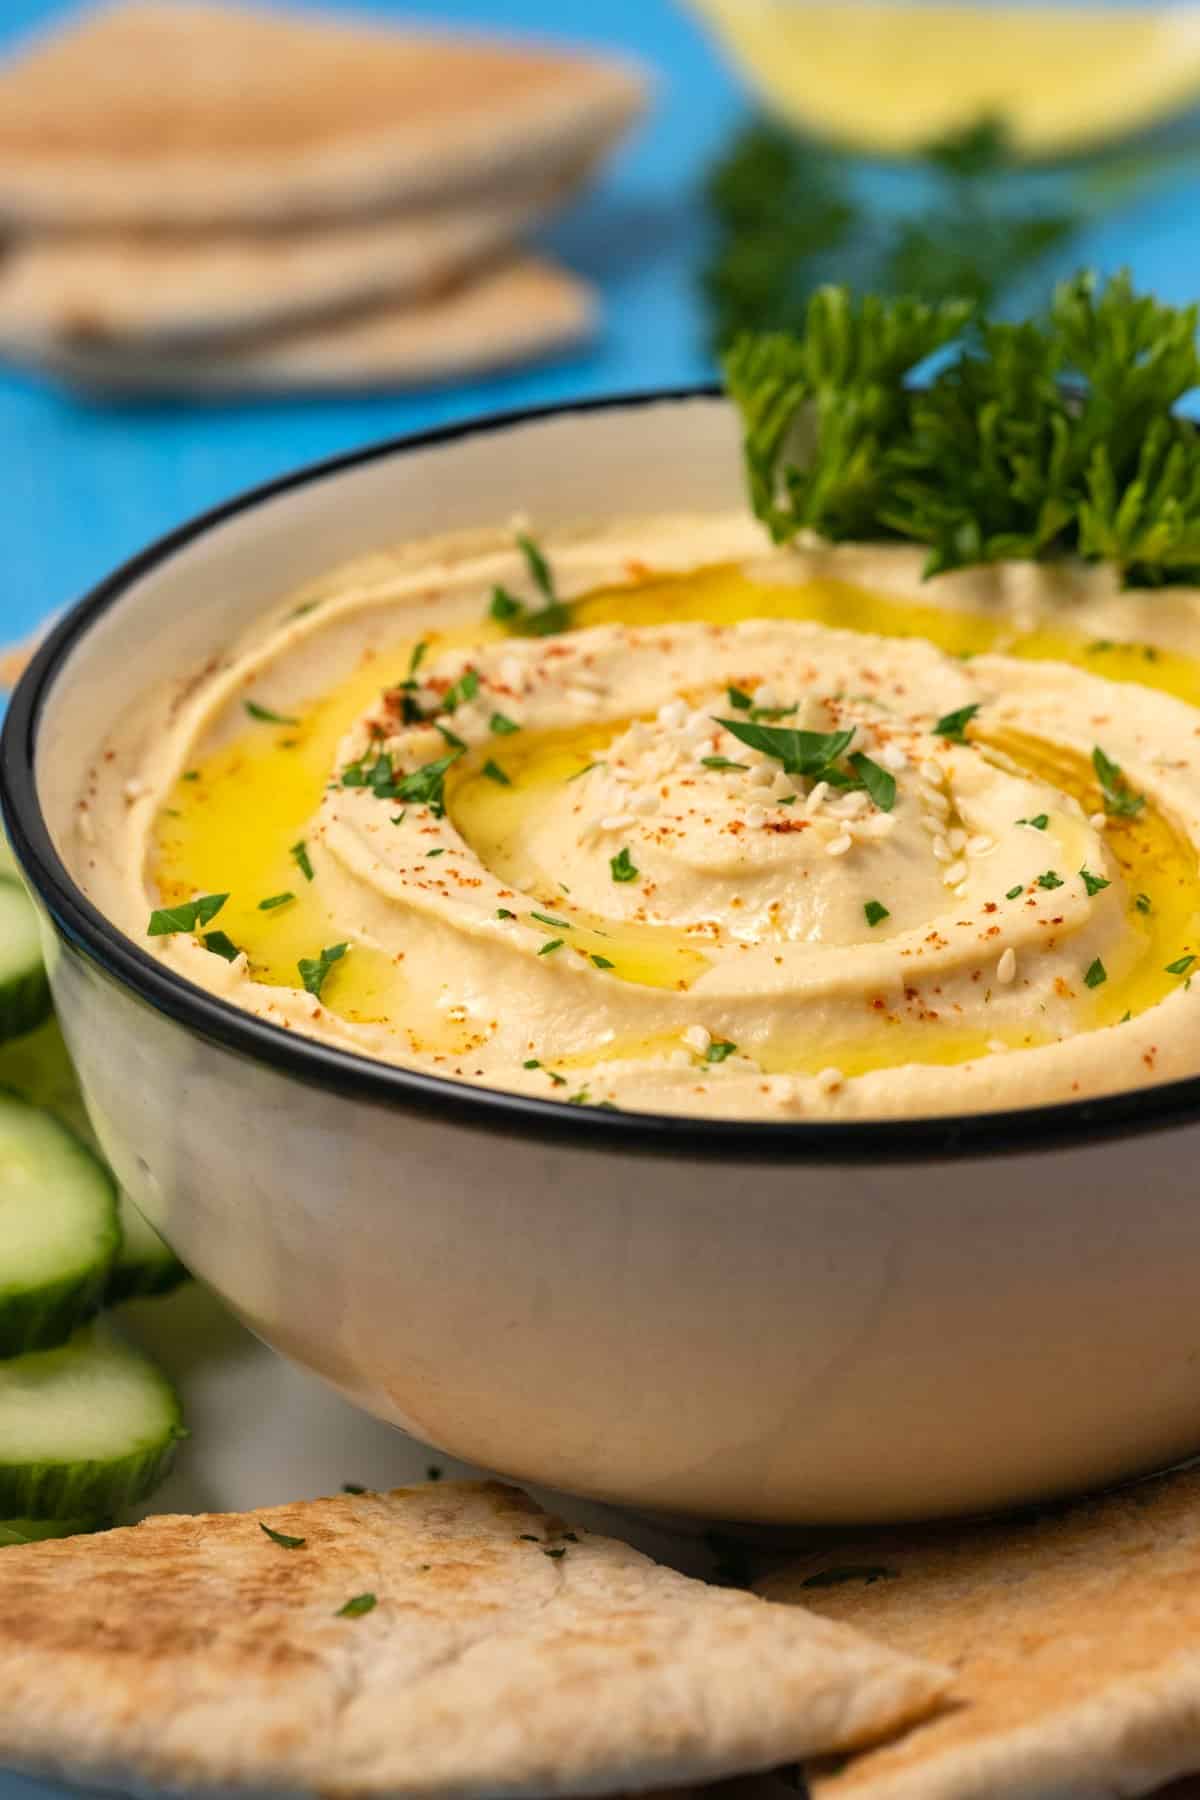
    Top Tip: Let your food processor run for a few minutes to get your hummus really smooth.

    Smooth roasted garlic hummus in a food processor.

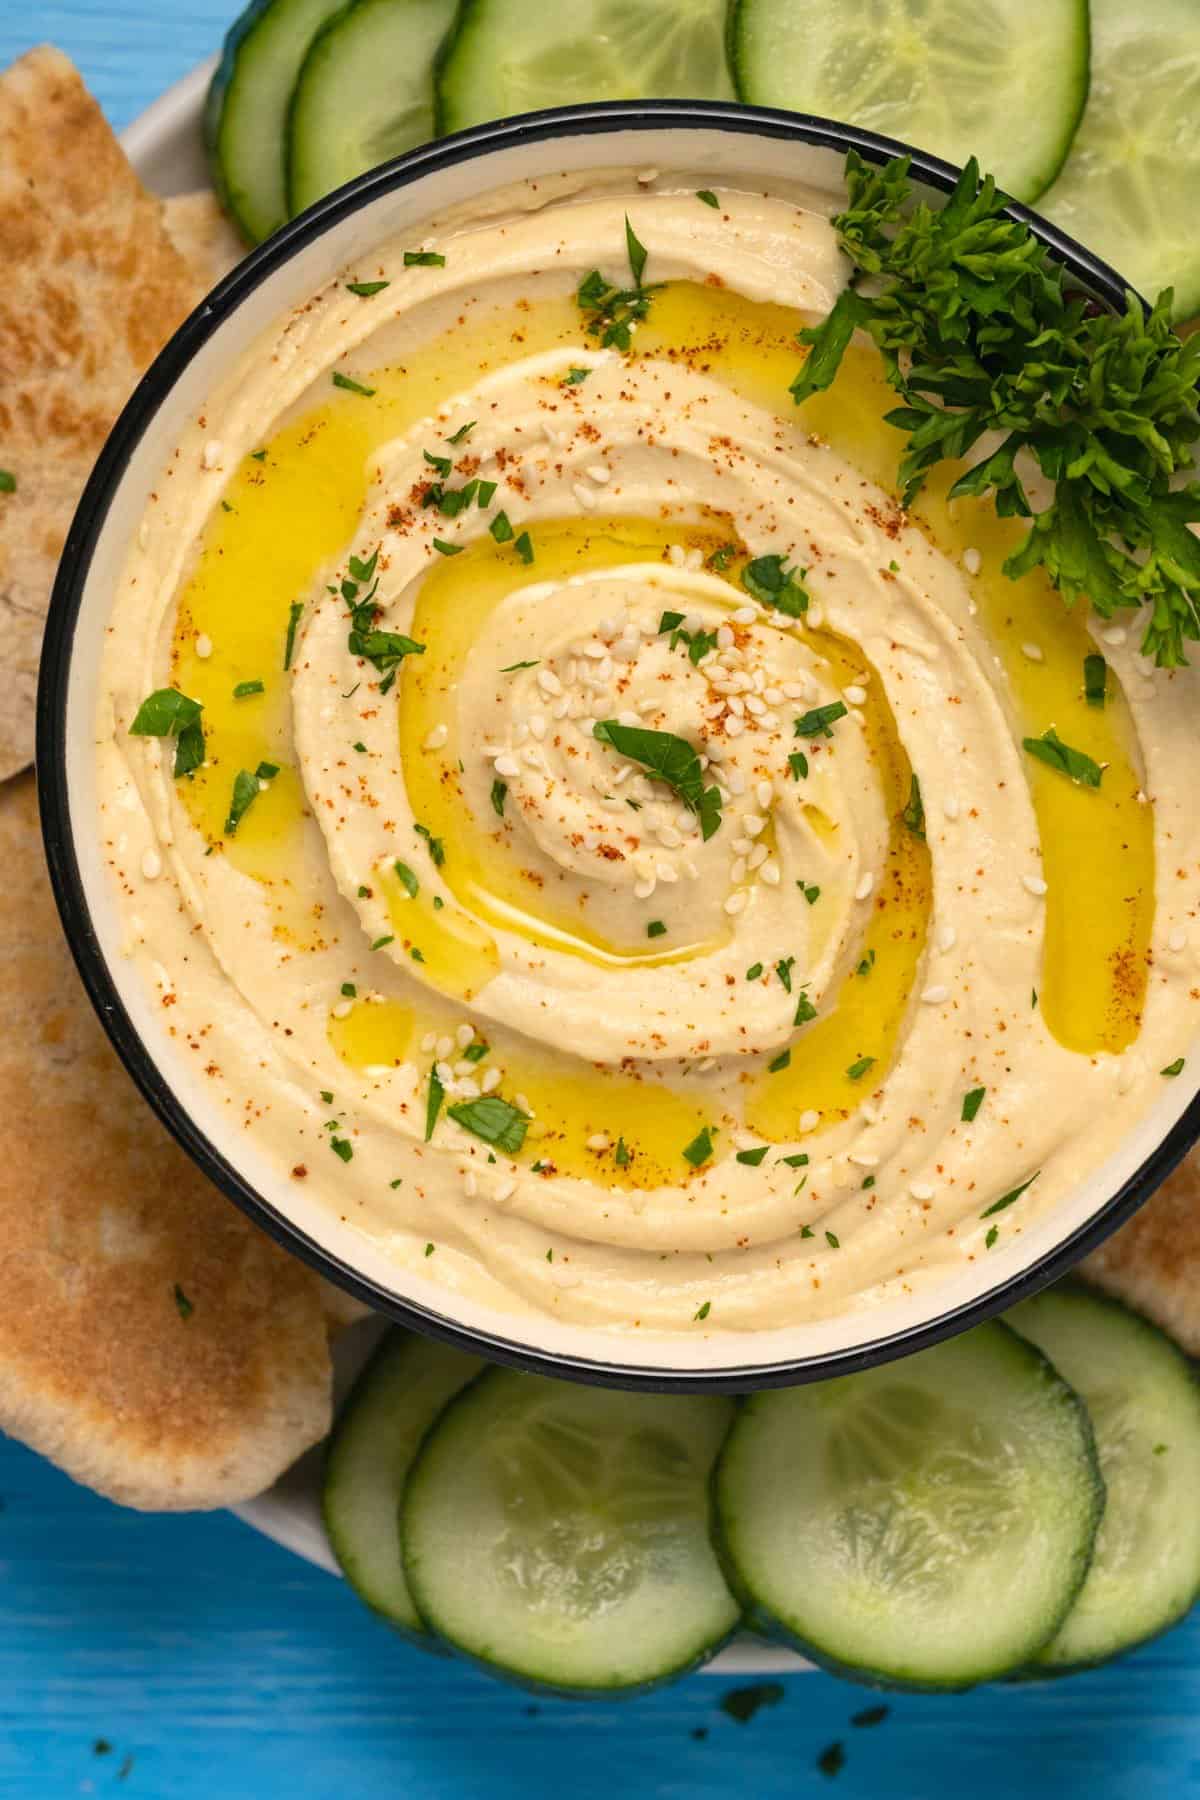
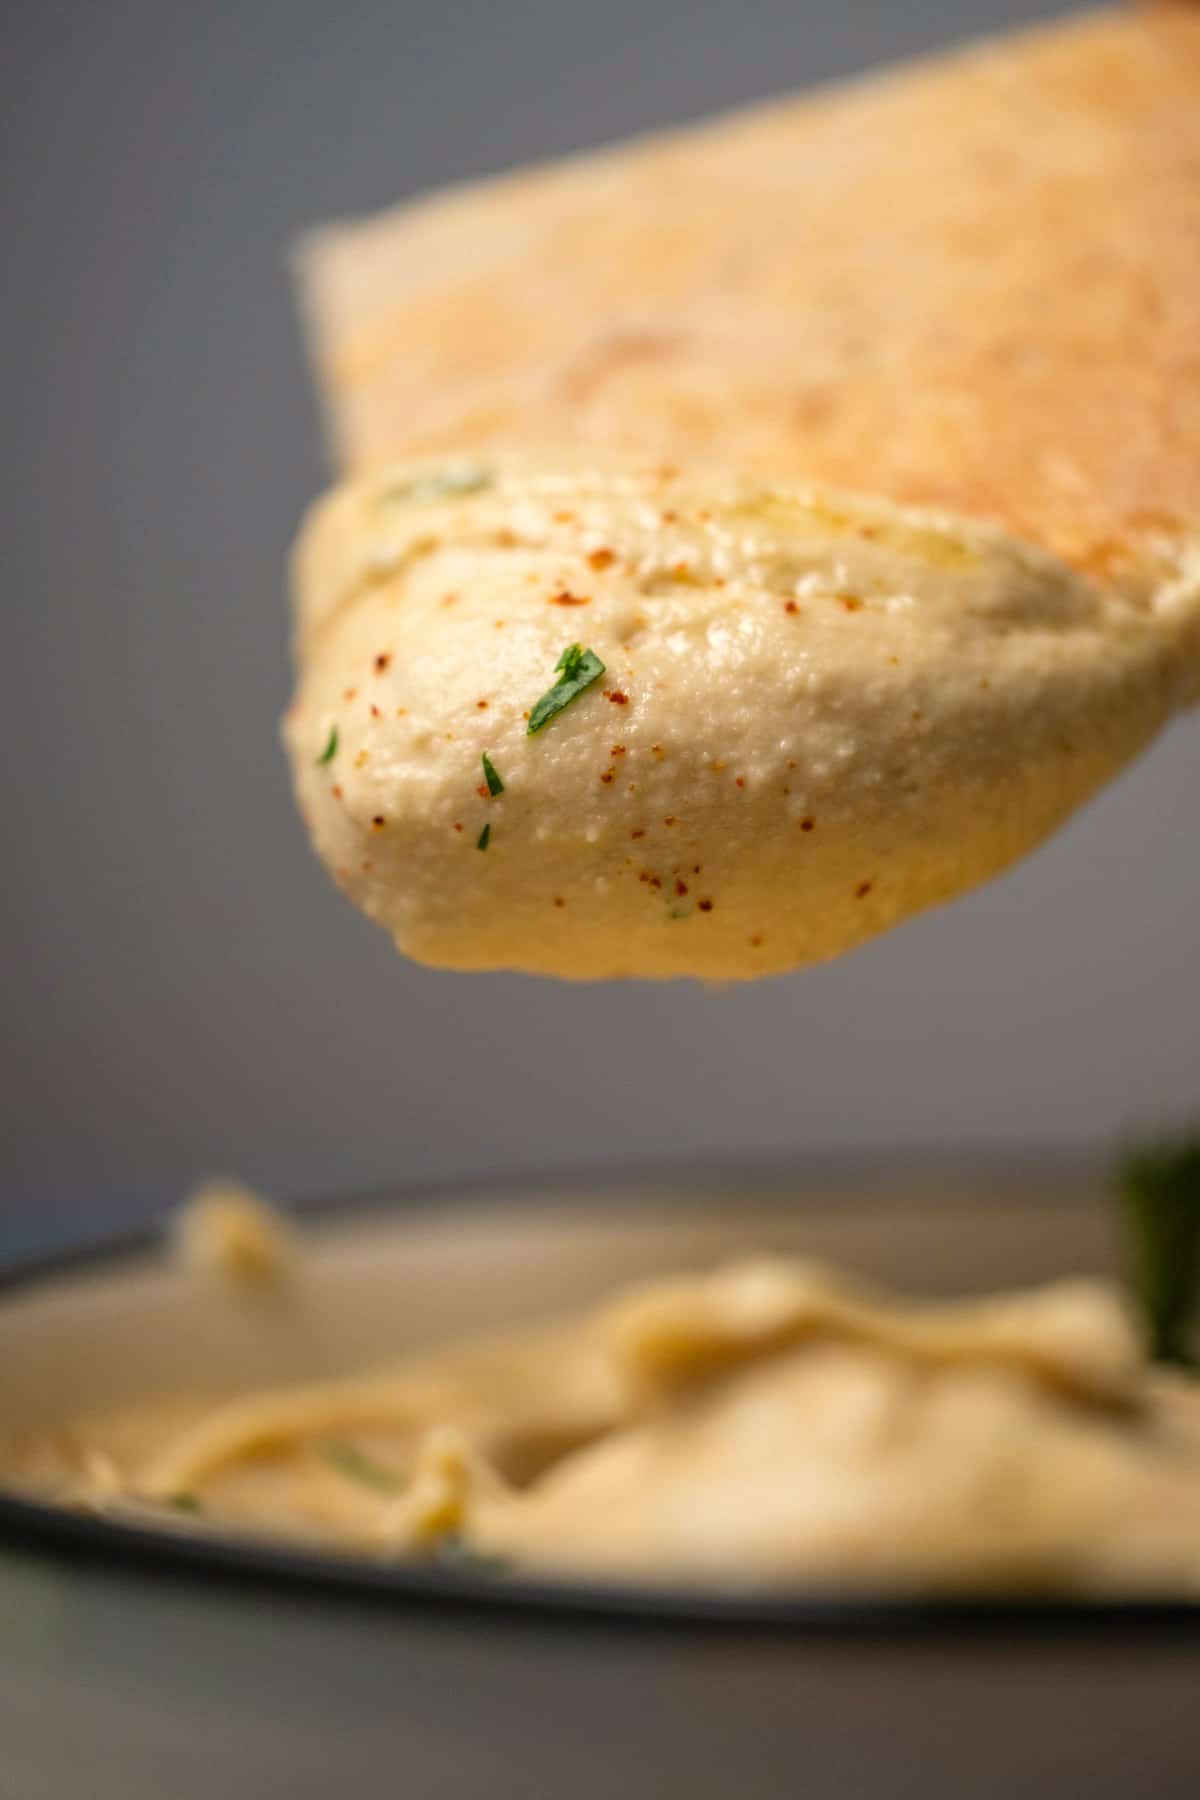
    How To Serve Roasted Garlic Hummus

    Serve topped with a sprinkle of smoked paprika, chopped parsley, sesame seeds and a drizzle of extra virgin olive oil. Add raw veggies and pita breads on the side for dipping.

    It’s also delicious as a spread for sandwiches or with chips or crackers.

    Hummus in a ceramic bowl with pita breads and sliced cucumber on the side.

    Storing and Freezing

    Keep leftovers stored in the fridge (covered) for 3-4 days. It is freezer friendly if you want to freeze some, but just keep in mind that it can expand when frozen, so place it into a freezer safe container with a little room to spare.

    Pita bread dipping into a bowl of hummus.

    More Delicious Vegan Dips

    1. Eggplant Dip
    2. Avocado Hummus
    3. Vegan Spinach Artichoke Dip
    4. Vegan Tzatziki
    5. Vegan Queso
    6. Vegan Spinach Dip

    Did you make this recipe? Be sure to leave a comment and rating below!

    Roasted garlic hummus in a ceramic bowl.

    Roasted Garlic Hummus

    Seriously the BEST roasted garlic hummus. Packed with flavor from two whole heads of roasted garlic, it’s insanely delicious and the perfect dip.
    5 from 9 votes
    Print Pin Rate
    Course: Appetizer, Dip
    Cuisine: Mediterranean
    Diet: Vegan
    Prep Time: 45 minutes
    Total Time: 45 minutes
    Servings: 8
    Calories: 161kcal
    Author: Alison Andrews

    Ingredients

    • 2 Whole Heads Garlic
    • 2 teaspoons Olive Oil Extra Virgin
    • 15 ounce Can Chickpeas Drained, or 1 and ½ cups cooked chickpeas
    • 2 Tablespoons Lemon Juice Freshly Squeezed
    • ⅓ cup Tahini (80g)
    • ¼ teaspoon Salt
    • ½ teaspoon Cumin
    • 2 Tablespoons Olive Oil Extra Virgin
    • 4 Tablespoons Cold Water

    For Serving (Optional):

    • Smoked Paprika
    • Fresh Chopped Parsley
    • Sesame Seeds
    • Olive Oil Extra Virgin
    • Pita Breads
    • Raw Veggies
    Prevent your screen from going dark

    Instructions

    • Start by roasting the garlic. Preheat the oven to 430°F (220°C)
    • Remove just the outer flaky layers of the two heads of garlic, leaving the inner skins intact. Using a knife chop off just the tips of each clove. Place in foil and pour over 1 teaspoon of olive oil for each head of garlic and rub it around the sides so that the garlic is covered with the oil. Wrap them up in the foil, place on a parchment lined baking tray and bake in the oven for 35 minutes. When cooked, remove from the foil, allow to cool for a few minutes until they're cool enough to handle and then pop the cloves out into a bowl using your fingers.
    • Make the hummus. Add the chickpeas, roasted garlic, lemon juice, tahini and 2 tablespoons of the cold water to the food processor. Process until chunky. Now add the salt, cumin, olive oil and remaining 2 tablespoons of cold water and process until smooth and creamy.
    • Serve topped with a sprinkle of smoked paprika, chopped parsley, sesame seeds and a drizzle of extra virgin olive oil. Add raw veggies and pita breads on the side for dipping.

    Notes

    1. Make it really smooth: Let your food processor run for a few minutes to get your hummus really smooth.
    2. Storing. Keep leftovers stored in the fridge (covered) for 3-4 days.
    3. Prep time includes the 35 minutes spent roasting the garlic.
    4. Nutritional information is for the hummus only and excludes anything you would serve with it.

    Nutrition

    Serving: 1Serve | Calories: 161kcal | Carbohydrates: 13.2g | Protein: 4.7g | Fat: 10.8g | Saturated Fat: 1.4g | Sodium: 173mg | Fiber: 3.3g | Sugar: 1.7g
    DID YOU MAKE THIS RECIPE? Rate it & leave your feedback in the comments section below, or tag @lovingitvegan on Instagram and hashtag #lovingitvegan
    Get Your Copy! It's FREE!
    « Vegan Enchiladas
    Vegan Gravy »
    2.8K shares

    About the Author

    Hi I'm Alison Andrews, I'm the voice and cook behind Loving It Vegan. I love making delicious vegan food and creating vegan versions of all your old favorites, so that you’ll never feel like you’re missing out. Find out more about me here.

    Loving It Vegan is a participant in the Amazon Services LLC Associates Program, an affiliate advertising program designed to provide a means for sites to earn advertising fees by advertising and linking to Amazon.com. This site may contain some of these links to Amazon.com. If you make a purchase through one of those links, Loving It Vegan will receive a small commission from the purchase at no additional cost to you.

    Reader Interactions

    Comments

    1. Linda Scott says

      September 14, 2020 at 12:06 am

      Hello Alison , I would like to know if you have ever added Potassium Sorbate and Citric Acid to your dips or other food products to extend the shelf life . If you have what type of extended shelf life did you achieve .

      Reply
      • Alison Andrews says

        September 14, 2020 at 10:26 am

        Hi Linda, I haven’t ever experimented with those so I don’t have any info or advice to share.

        Reply
    2. Rosalie P says

      September 03, 2020 at 1:29 pm

      Just made this! This is the best hummus l have ever tasted. Served it with lightly toasted pita bread and sliced cucumber. Will never buy commercially made hummus again.5 stars

      Reply
      • Alison Andrews says

        September 04, 2020 at 9:31 am

        Yay! That’s so awesome Rosalie! Thanks for sharing.

        Reply
    3. One says

      August 28, 2020 at 8:30 am

      My first time making hummus. This recipe was so simple and it tastes delicious! It’s perfect. Thank you so much.5 stars

      Reply
      • Alison Andrews says

        August 28, 2020 at 10:44 am

        So glad you enjoyed it! 🙂

        Reply
    4. Anna says

      August 20, 2020 at 1:48 pm

      Simply the Best!5 stars

      Reply
      • Alison Andrews says

        August 21, 2020 at 9:05 am

        Thanks Anna!

        Reply
    5. buddy says

      August 16, 2020 at 12:56 pm

      Tops5 stars

      Reply
      • Alison Andrews says

        August 17, 2020 at 9:47 am

        Thank you!

        Reply
    6. Kathy says

      April 25, 2019 at 12:34 pm

      Another hit! You are too much.5 stars

      Reply
      • Alison Andrews says

        April 26, 2019 at 9:40 am

        Hahaha, so happy to hear! Thanks Kathy! 🙂

        Reply
    7. Anna Andrews says

      February 22, 2017 at 7:47 am

      Superb!5 stars

      Reply

    Comment Policy: Your feedback is really appreciated! Please do us a favor and rate the recipe as well as this really helps us! The most helpful comments are the ones that give useful feedback for others who might make the recipe, tell about substitutions you made or adjustments you made and how it turned out, or assisting other commenters. Rude or insulting comments will not be accepted.

    Leave A Comment & Review Cancel reply

    Your email address will not be published. Required fields are marked *

    Recipe Rating


    Primary Sidebar

    Hi I’m Alison Andrews! I love making delicious vegan food and creating delicious vegan versions of all your old favorite dishes, so you can have your vegan cake and eat it too!

    More about me →

    • Facebook
    • Twitter
    • Instagram
    • YouTube
    • Pinterest

    Popular Posts

    • Vegan Tuna
    • The Best Vegan Mac and Cheese (Classic, Baked)
    • Vegan Burrito
    • Super Eggy Vegan Tofu Scramble
    • Sliceable Cashew Cheese
    • Homemade Vegan Butter

    Veganuary

    • Vegan Halloumi
    • Vegan Stuffed Mushrooms
    • Vegan Stuffed Peppers
    • Vegan Granola
    • The Best Vegan Waffles
    • Vegan Salmon

    See all Veganuary Recipes →


    Footer

    ↑ back to top

    As Seen In

    Press logos black and white

    About

    • Privacy Policy
    • Terms & Conditions

    Follow Us

    • Facebook
    • Twitter
    • Instagram
    • YouTube
    • Pinterest

    Contact

    • About
    • Contact

    Copyright © 2022 Loving It Vegan

    Get 10 fabulous dinner recipes!
    Absolutely free! Sign up below!
    Get Your Copy! It's FREE!